How to Soothe a Sunburn in Minutes With This DIY Gel
You can soothe a sunburn in just minutes with an easy DIY gel! First, grab some aloe vera gel, coconut oil, a few drops of lavender essential oil, and vitamin E oil. Mix one cup of aloe vera with two tablespoons of coconut oil and a dash of lavender in a bowl. Once it’s smooth, gently apply a thin layer to your irritated skin. This gel cools your skin, hydrates, and helps you heal faster. Reapply every few hours for the best relief. Plus, if you’re curious about other soothing tricks or tips, there’s plenty more to explore!
Understanding Sunburn Symptoms
When you spend too much time in the sun, it’s important to recognize the symptoms of sunburn early.
First things first, you might notice your skin getting red and warm. That’s your body’s way of saying, “Hey, I need a break!” You might also feel a bit of tenderness or even some itchiness. If you touch your skin and it feels hot, that’s definitely a sign you’ve overdone it.
As the day goes on, you might see blisters popping up. They’re like little reminders that your skin’s been through a lot.
If you feel dizzy or get a headache, that could mean you’re dehydrated, which is another effect of too much sun.
And let’s not forget the peeling! In a few days, your skin might start to flake off, which can be annoying.
Benefits of DIY Sunburn Gel
Making your own sunburn gel has some fantastic benefits!
You get to choose natural ingredients, which means no weird chemicals, and your skin will thank you for it.
Plus, when you whip it up at home, you can feel relief quickly, turning that fiery red into a more comfortable glow in no time!
Natural Ingredients Advantage
A DIY sunburn gel made from natural ingredients offers numerous advantages over commercial products. First off, you know exactly what’s going into your gel. No mysterious chemicals or hard-to-pronounce names here! You get to choose soothing ingredients like aloe vera, coconut oil, and essential oils that are gentle on your skin.
Using these natural ingredients means you’re less likely to irritate your already tender skin. Commercial gels can sometimes contain alcohol or artificial fragrances that might sting. Ouch!
Another great perk is that you can customize your gel to suit your needs. If you love the scent of lavender, add a few drops! Want extra moisture? Toss in some honey! The possibilities are endless, and it can be super fun to mix your own concoction.
Plus, making your own gel can save you money. Why spend a lot on pricey products when you can whip up something at home?
Quick Relief Properties
There’s nothing quite like the soothing relief a DIY sunburn gel can provide after a long day in the sun. When you’ve spent too much time basking in those rays, this gel is your best friend. You’ll feel the coolness on your skin instantly, and that’s just the start of its magic.
The ingredients in your homemade gel, like aloe vera and coconut oil, work together to hydrate and calm your sunburned skin. They help reduce redness and swelling, which means you’ll be back to feeling like yourself in no time.
Plus, making the gel is super easy! You can whip it up in just a few minutes.
When you apply the gel, you’re not just getting relief; you’re also giving your skin the love it needs to heal. You’ll notice how quickly it soothes that burning sensation, making it easier for you to relax and enjoy your evening.
Essential Ingredients Needed
To create an effective DIY gel for sunburn relief, you’ll need a few essential ingredients that work together to soothe and heal your skin.
Think of these ingredients as your sunburn-fighting superheroes, ready to swoop in and save the day!
- Aloe Vera Gel – This is the star of the show! It cools your skin and helps reduce inflammation.
Plus, it feels nice and slippery, like a little hug for your sunburn!
- Coconut Oil – Not only does it smell amazing, but it also hydrates your skin.
It’s like a moisture blanket that helps your skin heal faster.
- Lavender Essential Oil – This oil has calming properties.
It can help relieve pain and make you feel relaxed, almost like a mini spa day—who wouldn’t love that?
- Vitamin E Oil – This ingredient is a skin healer!
It helps repair damaged skin and keeps it nourished, giving you a head start on recovery.
Gather these ingredients, and you’ll be well on your way to making your very own soothing gel.
Your sunburn won’t know what hit it!
Step-by-Step Recipe
Now that you’ve gathered all those essential ingredients, it’s time to whip up your sunburn gel!
You’ll mix everything together and create a soothing relief that your skin will love.
Don’t forget to pay attention to how you apply it, because the right technique can make all the difference!
Ingredients You’ll Need
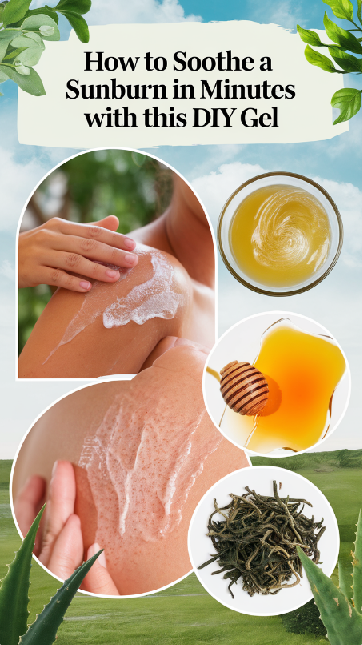
For a soothing DIY gel to combat sunburn, you’ll need a handful of simple ingredients that you probably already have at home. These items will help cool your skin and provide relief from that annoying burn. Let’s gather what you need!
-
Aloe Vera Gel: This magical plant is famous for its skin-soothing properties. If you have an aloe plant, just scoop out the gel from the leaves!
-
Coconut Oil: Not only does it smell amazing, but it also hydrates your skin. Plus, it’s great for keeping your skin moisturized after the burn.
-
Vitamin E Oil: This oil is a superstar when it comes to healing. It helps repair your skin and can even reduce scarring.
-
Lavender Essential Oil: Not only does it smell delightful, but it also has anti-inflammatory properties. Just a few drops will add a lovely scent and boost the gel’s calming effects.
Now that you have your ingredients ready, you’re one step closer to making that refreshing gel.
Trust me, your skin will thank you later!
Mixing Instructions
You’ve gathered all the ingredients, so let’s get started on mixing your DIY gel for sunburn relief. First, grab a clean mixing bowl and a whisk. You’ll want to make sure everything is nice and tidy, because nobody wants a messy kitchen when they’re trying to soothe a sunburn!
Start by pouring in one cup of aloe vera gel. It’s the star of this show, so don’t hold back!
Next, add about two tablespoons of coconut oil. This will help keep your skin moisturized while giving the gel a lovely texture.
Now, it’s time to sprinkle in a few drops of lavender essential oil for a calming scent. You can even pretend you’re at a spa!
Whisk everything together until you see a smooth, creamy consistency. If it looks a bit lumpy, don’t worry—just keep stirring!
Finally, transfer your gel into a clean jar or container with a lid. Your DIY gel is now ready to cool in the fridge. Trust me, it’ll feel amazing on your sunburned skin.
You’ve done it! Now go ahead and enjoy your refreshing creation.
Application Tips
Applying your DIY gel for sunburn relief is a breeze and can make a world of difference for your skin.
You’ll want to follow these simple steps to ensure you get the most soothing benefits from your gel.
-
Cool Off: First, make sure your skin is cool. If you’ve just come inside from the sun, wait a few minutes before applying. This way, your skin can absorb the gel better.
-
Squeeze and Spread: Take a small amount of the gel and squeeze it directly onto the sunburned area. Don’t go overboard; a little goes a long way!
-
Gentle Massage: Use your fingertips to gently massage the gel into your skin. This helps it soak in and feel even better. Just remember, no rough rubbing; be kind to your sun-kissed skin!
-
Reapply: Finally, reapply the gel every few hours, especially if you’re still feeling discomfort. Keeping your skin moisturized is key to recovery.
Application Techniques
To effectively soothe sunburn, mastering the right application techniques can make all the difference. First, make sure your skin is clean and dry. You don’t want to trap any dirt or sweat under the gel!
Next, scoop out a generous amount of the DIY gel and warm it slightly in your hands. This helps it glide smoothly onto your skin.
Gently spread the gel over the sunburned areas using your fingertips. Don’t rub too hard; you want to be gentle, like you’re petting a cat. Apply it in a thin, even layer to cover the affected skin completely. If you feel any stinging, stop and take a break. It’s important to listen to your body.
After applying, allow the gel to absorb for a few minutes before putting on any clothing. This way, it won’t stick to your fabric and can work its magic!
And remember, if you’re still feeling hot, you can reapply the gel every few hours. Just think of it as giving your skin a refreshing little drink! Keep it handy, and you’ll be on your way to feeling better in no time.
Additional Soothing Remedies
Relief from sunburn can be enhanced with a variety of soothing remedies that complement your DIY gel.
While your gel works wonders, adding these extra touches can make your skin feel even better. You’ll be surprised how simple things can help you out!
Here are four soothing remedies you might want to try:
-
Cool Compresses: Grab a clean cloth, soak it in cool water, and lay it on your sunburned skin. It feels great and helps reduce inflammation!
-
Aloe Vera: If you’ve got an aloe plant, cut a leaf and apply the gel directly to your skin. It’s super moisturizing and has healing properties.
-
Green Tea Bags: Steep some green tea bags in water, let them cool, and place them on your sunburn. The antioxidants can help with healing, plus it’s refreshingly cool!
-
Coconut Oil: Once your sunburn starts to heal, a little coconut oil can help keep your skin moisturized. Just wait until the sting is gone!
Try these remedies alongside your DIY gel, and you’ll be on your way to feeling comfortable again!
Preventing Future Sunburns
After finding relief from your sunburn, it’s time to focus on preventing future occurrences. Trust me, no one wants to go through that painful red phase again!
The first step is to wear sunscreen every time you step outside. Choose a broad-spectrum sunscreen with at least SPF 30, and don’t forget to reapply every two hours, especially if you’re swimming or sweating.
Next, consider wearing protective clothing. Light, long-sleeved shirts and wide-brimmed hats can keep those harmful rays at bay. Think of it as your stylish armor against the sun!
Also, try to stay in the shade, especially during peak sun hours, which are usually between 10 a.m. and 4 p.m. If you can, plan your outdoor activities for early morning or late afternoon when the sun isn’t as strong.
And remember, it’s not just about prevention; it’s about staying smart! Check the UV index in your area before heading out. If it’s high, take extra precautions.
With these tips, you can enjoy the sun without the burn, keeping your skin happy and healthy!
When to Seek Medical Help
Occasionally, sunburns can escalate beyond simple discomfort, signaling the need for medical attention.
While most sunburns heal on their own, some symptoms indicate it’s time to see a doctor. You don’t want to underestimate your skin’s signals, so keep an eye out for these warning signs:
-
Severe Pain: If your sunburn hurts more than a typical burn, it might be time to get checked out.
-
Blistering: If you notice large, painful blisters forming, that’s a signal that your skin needs professional care.
-
Fever or Chills: Feeling feverish or experiencing chills can mean your body’s reacting strongly to the sunburn.
-
Signs of Infection: If the burned area starts to ooze, turn redder, or feels increasingly painful, those could be signs of an infection.